So what is Laserstorm? It's a new sci-fi wargaming ruleset released yesterday and available as a PDF. Aimed at 3mm, 6mm and 10mm sci fi, as a mass combat rule system. Get it here from Wargame Vault.
Now there are many rulesets out there, and I don't have time or interest in looking at most of them, but the introductory design brief of this one grabbed my attention:
It always helps to outline the goals and objectives of a system up front.
For LaserStorm, the following were the goals that were set:
* Game play that is simple, without too many fringe cases.
* Play quickly, even with a lot of troops on the table.
* Allow very large amounts of diverse figures on the table at the same time
* Core mechanics can be condensed to a few pages
* No markers, counters, templates or other indicators needed
* No record keeping needed other than your army lists.
* “Blasters and jet packs” scifi, rather than hard military realism.
This sort of outline appeals to me. Epic Armageddon is a great ruleset, but something even quicker playing and thus more suitable for bigger battles would be nice given the number of figures I have. So I picked this up to give it a try. Not looking for a replacement for Epic Armageddon, but rather something potentially complementary for a different style of game.
The Laserstorm rules are 92 pages, clearly written and easy reading. Not too much text per page and sensible page divisions, and a few photos of figures every few pages. About half of it is the rules for playing a battle game. This is followed by a small set of ready made unit profiles and then detailed rules for creating and points costing your own units. Some suggested rules for assembling armies follow. Then there is a standard "tournament" style game scenario, other options for play and a campaign section. Lastly there is an introductory scenario to get you started. All up pretty comprehensive and clearly a fair bit of thought has gone into the mechanics at each stage, with variant optional mechanics frequently suggested which is appreciated.

I decided to give the introductory scenario a try to help learn the rules. This involves identical forces on each side, of 9 vehicles and 18 infantry. This could be mixed up into different sorts of formations, but I went with the following identical organisations for each side to keep it simple.
2nd Battle Group: Commander and 2 x Units of 4 Infantry with 2 APCs
3rd Battle Group: Commander and 2 x Units of 5 Heavy Infantry
4th Battle Group: Commander and 2 x Units of 3 Tanks
Some old school Epic figures were used to play the game. Looking at the profiles in the introductory scenario the units should probably be standard humans (like Imperial Guard), but here I'm using Space Marine and Chaos Marine figures, and Chaos walkers are representing the Chaos Tanks.
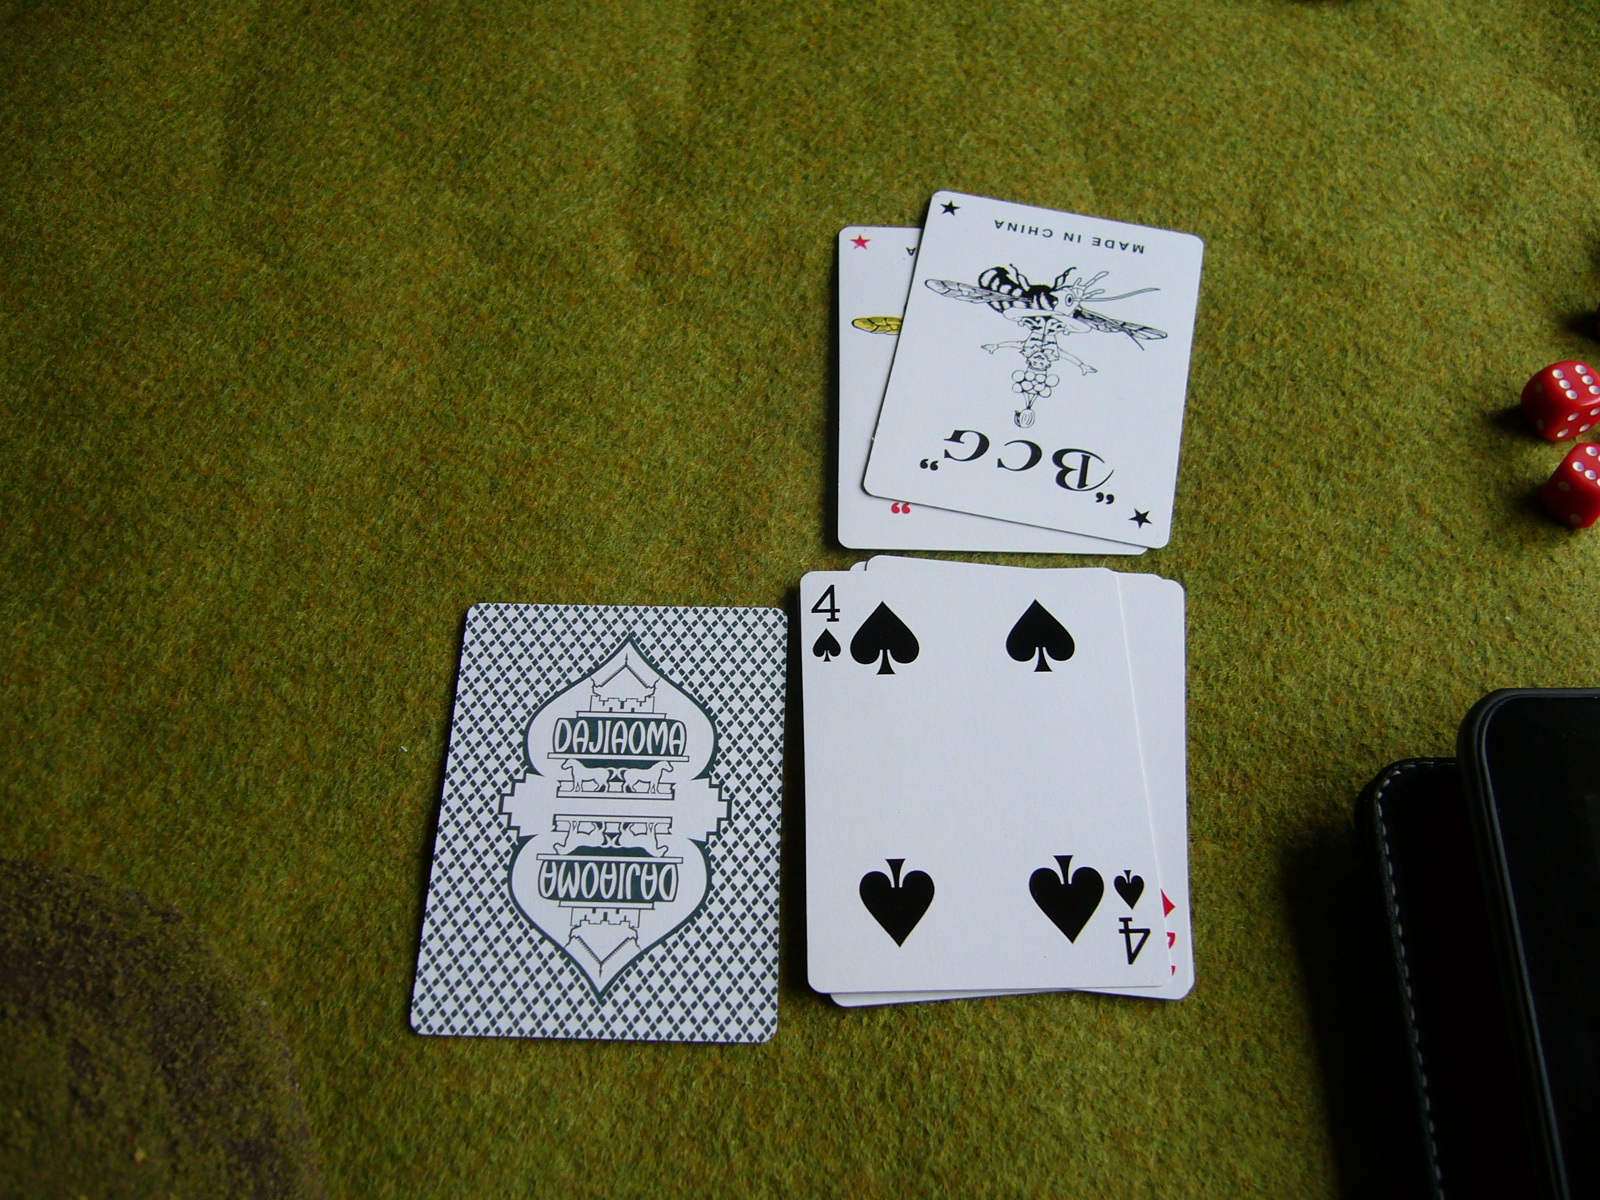
To play you need some standard playing cards, six sided dice, tape measure and the rules. One card is chosen to represent each Battlegroup on each side. So here the spades represent the Chaos Battle Groups, diamonds the Imperials. A number of "snap action" cards are added. I put in two here (Jokers). Play proceeds by shuffling the deck and turning over one card at a time. Each Battle Group activates as its card is revealed, thus making it uncertain exactly when events will occur (a 'Fog of War' mechanic). The snap action cards when drawn are put to one side, and then given to the player whose battle group card is NOT drawn next. The snap action cards can be used to activate a unit (not a whole Battlegroup) out of sequence to move or shoot - a bonus move but not as effective as a general move.
2nd Battle Group: Commander and 2 x Units of 4 Infantry with 2 APCs
3rd Battle Group: Commander and 2 x Units of 5 Heavy Infantry
4th Battle Group: Commander and 2 x Units of 3 Tanks
Some old school Epic figures were used to play the game. Looking at the profiles in the introductory scenario the units should probably be standard humans (like Imperial Guard), but here I'm using Space Marine and Chaos Marine figures, and Chaos walkers are representing the Chaos Tanks.
To play you need some standard playing cards, six sided dice, tape measure and the rules. One card is chosen to represent each Battlegroup on each side. So here the spades represent the Chaos Battle Groups, diamonds the Imperials. A number of "snap action" cards are added. I put in two here (Jokers). Play proceeds by shuffling the deck and turning over one card at a time. Each Battle Group activates as its card is revealed, thus making it uncertain exactly when events will occur (a 'Fog of War' mechanic). The snap action cards when drawn are put to one side, and then given to the player whose battle group card is NOT drawn next. The snap action cards can be used to activate a unit (not a whole Battlegroup) out of sequence to move or shoot - a bonus move but not as effective as a general move.

Here's the setup for the game, played on a 4' x 4' table. The two objectives are in the middle of the table, one on each side (on top of the left centre hill, and to the right of the right centre ruins). Each turn you hold an objective by having one of your units within 4" and no enemy within 4", you get a point for that objective. Once you get to 4 points you win this scenario.

Turn 1
First card drawn is Chaos Heavy Infantry who advance forward. Movement is only 4" or 10cm, which seems slow compared to Epic Armageddon. You can double move with infantry or cavalry but it is a morale test to do so unless you contact enemy (representing forces really exerting themselves). You are dispersed (removed from play) and have to regroup (morale test to be brought back into play) if you fail. I'll talk more about morale later. For now I decide to leave them to walk forward slowly. I suspect I might go with 6" or 15cm infantry moves if making Epic Armageddon style army lists so as to make the feel of the game more comparable.
Following this the Chaos Mechanised Infantry card is drawn and they move, the APC's moving 12" (30cm), which is the same as Epic Armageddon. They left hand formation moves 11" because the infantry get out (1" cost). The infantry then shoots at the Imperial infantry ahead of it, missing.

RULES NOTE: Firing is based on your aim characteristic, in this game all figures had an aim of 5+, except for the tanks which were 4+. You have to roll your aim score or higher to hit, with a -1 if the enemy unit is concealed (ruins, behind crest of hill etc). When you hit the enemy must make a saving throw by rolling and adding together a number of D6 dependent on your figure type. This means you roll 1 dice for infantry, 2 dice for vehicles, 3 dice for super-heavies, and 4 dice for Behemoths. The combined score has to be equal or higher than your armour otherwise you are destroyed. In this game tanks had an armour of 3, APCs an armour of 6, and infantry an armour of 5. Weapons can have save modifiers which apply to the dice score of the target, for example the Tanks main gun had a -5 save vs vehicles, and -1 save vs infantry. Cover (ruins in this game), gives an extra unmodifiable 5+ saving throw.
Additionally some weapons are general purpose, and some are specifically anti-tank or anti-infantry. If you are firing an anti-tank weapon at infantry or an anti-infantry gun at vehicles, you need 6's to hit.
The next card drawn is the Imperial tanks. They advance and shoot the Chaos Mechanised Infantry. They get 3 hits, but they are all saved. The infantry here have a 5+ saving throw for armour (6+ if hit by the tanks main gun) and a unmodifiable cover save of 5+ for the ruins.

Next card is the Imperial Mechanised Infantry. One unit races forward to the ruins, and opens fire at the Chaos Mechanised Infantry, managing to destroy an APC.

When a unit takes casualties it must make a morale roll, after a single casualty if the unit is 2-4 units strong, and after 2 casualties if the unit is 5+ units strong. Not sure if you are supposed to count number of units before or after the casualties, couldn't find this in the rules? But in any case the Chaos Mechanised Infantry is still 5 units strong and doesn't have to make a morale roll.

Next card drawn is a Joker (Snap Action), and is placed to the side.

The Imperials thus take the two Snap action cards, which they can use prior to the Chaos Tanks activating. An Imperial Heavy Infantry unit use one card and fire at the Chaos Mechanised Infantry and miss. An Imperial Tank unit uses the other card and fires at the same target killing an infantry stand. As the Chaos Mechnised Infantry now has 4 units I say it must make a morale roll. It's morale is 4+ so it must roll 4 or more or be dispersed. It fails.

The Battle Group Commander is within 2" (5cm) though, and so is allowed to reroll, though if he fails he is also dispersed. This is what happens. The survivors go the the reserves table. This doesn't necessarily represent them fleeing the field, but rather that they are combat ineffective for now. They will be able to try and regroup when the card for their Battle Group is next drawn.

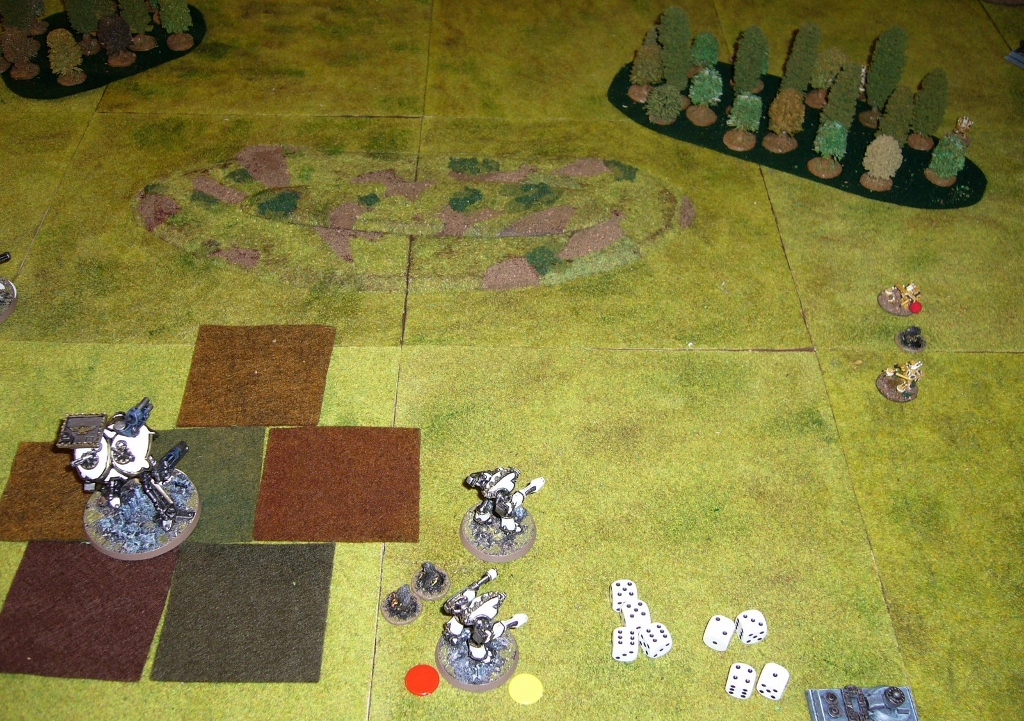
The Chaos Tanks now activate. The first unit moves to just behind the crest of the hill, and fires at the closest Imperial Tank unit. They get two hits with their main guns (-5 save modifer), needing 4+ to hit (aim score of 4+). Each Imperial tank has to roll two dice, subtract 5 from the result, and get 3 or more to save (or in other words, each tank needs to roll 8 or more on 2D6). Both tanks die. However the Imperial tank unit (now one model), passes its morale test (4+ as are all units in this game). The Chaos Tanks also fire their Machine Gun class weapons at the Imperial Infantry in the ruins, but do no damage.

The second Chaos Tank unit moves up besides their comrades and fires at the second Imperial Tank unit, but misses, and also missing with shots fired at the Imperial infantry in the ruins.

Next the Imperial Heavy Infantry advance and fire at the Chaos Tanks, but fail to damage them.
Turn 2
The cards are reshuffled and first card drawn is Chaos Heavy Infantry, and they open fire upon the Imperial Tanks second unit. The kill one tank, and the unit fails the morale roll and is dispersed and placed into reserves along with the commander who tried to reroll the morale test.

I make a slight mistake here, the Chaos Heavy Infantry have two "secondary" weapons, one anti-infantry and one anti-tank, and you can only fire one secondary weapon. I fire both though... and thus an Imperial Infantry is also killed.

Next the last Chaos Mechanised Infantry activate and the second unit rushes up to where their brother unit met its doom. They fire and kill an APC from the Mechanised Imperial Infantry ahead of them, which passes its morale roll. The Chaos Commander automatically regroups and I choose to place him nearby the Chaos Mechanised Infantry already on table. The other Chaos Mechanised unit fails to regroup though so stays in reserves.
RULES NOTE: Regrouping is what units in reserve have to do (pass a morale test) to come back onto the table. Each Commander can try this with one unit in reserve when the Battle Group activates. If passed the unit can be brought back within 8" of its Commander, not closer to the enemy than the Commander, and closer to the friendly table edge than the enemy table edge. It gets no action this turn though. Another point about morale tests is if you roll a 1 at any time, you automatically lose another unit in addition to failing! Also Commanders automatically regroup.

The third card turned over is the Chaos Tanks. That's three Chaos activations in a row. Ouch.

The Chaos Tank units destroy the remaining Imperial Tank on board, and also decimate the Imperial Mechanised Infantry, which nonetheless pass their morale again.
The Imperial Heavy Infantry fire back with no effect on the left, but destroying two figures from the right sided mechanised infantry, who also pass their morale roll.

Next move is the Imperial Mechanised Infantry. The left formation and Commander move towards the Chaos Tanks on the closest hill and the infantry debuss...

...and do a double move to assault the tanks.
RULES NOTE: In close combat you pair off combats and resolve them one at a time. Each figure roles a dice and adds its assault value (here both tanks and infantry have +1). The loser has to make an armour save modified by the amount they lost the combat by. In a draw both sides make an armour save. The loser also has to back off 3" if they survive. If multiple figures are attacking one figure (as here where two infantry are attacking one tank at one end of the line), then you add one to your assault value for each additional support in contact, but you still resolve combats one at a time.

Both sides lose two figures. Winning figures then get an additional 1" follow on move, attacker first, which brings the last tank into further combat. One more round of combat is fought if you make contact like this.

This second combat is a draw, and both sides pass their armour tests. However due to total casualties both sides have to make morale tests, and both sides are dispersed and go to reserves! The Imperial commander failed the reroll here and joins his unit in reserve.

Next card is the Imperial tanks, of which only a unit of two and the Commander are left in the reserves. The tanks pass their morale roll and I choose to place them back on the table near their left flank objective with their Commander. As they regrouped, this is all they can do this turn.

The last two cards will be Snap Actions, which are discarded as they cannot be used this turn given there are no more Battle Group cards left. At the end of this turn, both sides gain 1 victory point each for holding an objective each.

Turn 3
Imperial Tanks activate, and move and shoot the Chaos Heavy Infantry, killing one stand. The Chaos pass their morale roll.
The Chaos Tanks then activate and kill the last two Imperial Tanks. The one single Chaos tank in reserve fails to regroup.


Next the Chaos Heavy Infantry activates, and advances to claim the objective as well as killing one of the Imperial Heavy Infantry.

Next the Chaos Mechanised Infantry Activates. The unit off board in reserve tries to regroup but rolls a 1...

... so another figure is lost and it stays in reserve.


The Imperial Mechanised Infantry activate, and rally the offboard unit, coming on near the left flank objective, though this is their action for the turn.


Knocking out some Chaos Mechanised Infantry who fail their morale roll. The Chaos Heavy Infantry on the other flank also take a casualty and fail their morale roll.

Both sides get a victory point each. 2-1 to Chaos so far.
Turn 4
A snap action card is used by the Imperials and a Chaos Heavy Infantry is killed.
Before the Chaos tanks activate, running forward and killing the Imperial Mechanised Infantry including transports on the left flank. The Chaos Tank in reserve regroups and also comes back onto the table.

One of the Chaos Mechanised Infantry in reserve is now down to a single unit, and fails to rally. It then does what is called a "desperation rally". This means it can roll again, but if it fails it loses a number of units equal to the number it failed the roll by. So risky but it pays off here. The unit comes back onto the board. (I should have put their Commander back too, but forgot by the looks of things.)

The Imperial Heavy Infantry rush forward to contest the objective on the left flank, passing their morale check for doubling.

But the Chaos Heavy Infantry open fire, killing one of the Imperial Heavy infantry and the unit fails its morale and goes into reserve.

The Imperial Heavy Infantry open fire on the Chaos Mechnanised Infantry holding the right sided objective but fail to shift it. Chaos gets two more victory points and wins 4-1.

Conclusion
So a pretty simple game but served to test out the mechanics well enough. It seems like a solid sort of system, that is easily modifiable in ways you see fit. For example instead of going off table into reserves when you fail morale, an alternative given in the rules is to fall back 12". And one could vary the cards, or even not use them and just take an "I go, you go" approach or alternating activations or something. In practice I quite like how the mechanic worked though. It's also a sign of a good ruleset that you can tinker with it like this easily and such is encouraged by the author. The important thing is that the basic mechanics work well and there was not much I was left puzzling about, nor was there overly complex detail.One mechanic I forgot this game was the rule that rolls of 1 when firing force back an enemy figure by 3". Not sure if I will use this as it might be a bit fiddly for my liking, but I might try it out. Also I wasn't sure about Commanders, what happens to their Battle Groups if they die? And can you target Commanders? I said no unless they were the closest figure. I also ruled that Commanders couldn't hold objectives, only units.
I also like the fact (actually it is essential for my purposes really), that there are extensive lists of various unit traits and points values for making your own units. I'd really like to see people making some more extensive army lists for well known 6mm scale ranges, both existing ranges available to purchase now, and more ancient ones!
So then this is just a first few brief impressions, but I like what I've seen so far.
For reference there are some other threads on discussion forums about Laserstorm. See the following threads on The Miniatures Page here and here. And this thread on Tactical Command here.
And of course just to repeat the point, Laserstorm is available from from the Wargames Vault as a PDF.
Thanks for reading!